There’s something deeply satisfying about building something tangible with your own hands, especially when it comes to gaming. Cardboard arcade games, fully functional, playable recreations of classic arcade cabinets and original game designs made from corrugated cardboard, have exploded in popularity over the past few years. They’re cheap, accessible, environmentally friendly, and surprisingly versatile. Whether you’re looking to host a neighborhood tournament, teach kids about game design, or just flex your creative muscles, cardboard arcades deliver a unique hands-on experience that digital gaming can’t replicate.
This guide covers everything from sourcing materials and mastering construction techniques to hosting your own arcade event and keeping your builds tournament-ready. You’ll learn how to translate classic arcade mechanics into cardboard form, add authentic visual flair, and even incorporate basic electronics for that extra layer of polish. Let’s build.
Key Takeaways
- Cardboard arcade games deliver authentic gaming experiences using simple physics and low-tech engineering, making them accessible, sustainable, and perfect for building competitive events without expensive equipment.
- Successful cardboard arcade builds require double-walled corrugated cardboard, hot glue guns, rubber bands, and basic hand tools—no workshop necessary, and most materials can be sourced cheaply or free.
- Proper reinforcement techniques, including packing tape along fold lines, triple-thick impact zones, and cardboard gussets at joints, extend game lifespan from weeks to years of heavy use.
- Hosting a cardboard arcade tournament requires 4–6 diverse games with clear spacing, ticket-based scoring systems, and thematic decoration to create an authentic arcade atmosphere that drives player engagement.
- Cardboard arcade games complement digital gaming by offering tangible physical feedback, face-to-face social interaction, and creative ownership opportunities that screens cannot replicate.
What Are Cardboard Arcade Games and Why Are They Trending?
Cardboard arcade games are physical, playable game structures built primarily from cardboard and simple materials like rubber bands, marbles, and dowels. They replicate the mechanics and aesthetics of traditional arcade games, think skee-ball, pinball, claw machines, or racing games, using low-tech physics and clever engineering instead of electronics.
The History and Origins of DIY Cardboard Arcades
The modern cardboard arcade movement traces back to Caine’s Arcade, a 2012 short film documenting a 9-year-old boy named Caine Monroy who built an elaborate cardboard arcade in his father’s auto parts store in East Los Angeles. The film went viral, inspiring the Global Cardboard Challenge, an annual event that encourages kids and adults worldwide to create cardboard creations. Since then, makerspaces, schools, and gaming communities have embraced cardboard game construction as both an educational tool and a legitimate hobby.
The concept isn’t entirely new, DIY game construction has roots in the maker movement and analog game design communities dating back decades. But Caine’s story crystallized the idea that anyone with cardboard, creativity, and time could build something genuinely fun.
Why Gamers and Hobbyists Are Embracing Cardboard Gaming
Cardboard arcades appeal to gamers for several reasons. First, they’re a gateway into game design without requiring coding knowledge or expensive software. You’re directly manipulating physics, balance, and player feedback loops using your hands.
Second, they’re social. Building and playing cardboard games is inherently collaborative and tactile, offering a break from screen-based gaming. Many competitive gamers and streamers have documented cardboard arcade builds as passion projects, bringing crossover appeal to their audiences.
Third, sustainability matters. Gamers in 2026 are increasingly conscious of e-waste and the environmental cost of constant hardware upgrades. Cardboard is recyclable, biodegradable, and often free if you know where to look. Community events around DIY arcade builds have become more common at gaming conventions and local meetups, blending retro nostalgia with eco-friendly creativity.
Essential Materials and Tools for Building Cardboard Arcade Games
You don’t need a workshop full of power tools to build a functional cardboard arcade. Most projects can be completed with materials you already have or can source cheaply.
Choosing the Right Cardboard and Structural Materials
Not all cardboard is created equal. For structural integrity, prioritize:
- Double-walled corrugated cardboard: The gold standard for arcade builds. It’s thick, sturdy, and can handle repeated use. Appliance boxes (refrigerators, washing machines) are ideal sources.
- Single-walled cardboard: Fine for decorative panels or lightweight components, but avoid using it for load-bearing structures.
- Cardboard tubes: Paper towel and wrapping paper tubes work great for axles, ball ramps, and structural supports.
Other useful materials include:
- Hot glue sticks and white glue: Hot glue is fast and strong: white glue is better for precision work and allows repositioning.
- Duct tape and packing tape: Essential for reinforcement and quick fixes.
- Wooden dowels or skewers: Perfect for axles, levers, and pivot points.
- Rubber bands: Critical for spring-loaded mechanisms and tension-based game mechanics.
- Marbles, ping-pong balls, or small rubber balls: Your game pieces.
- String or fishing line: Useful for pulley systems and claw mechanisms.
Must-Have Tools and Accessories for Construction
Keep your toolkit simple but effective:
- Box cutter or utility knife: A sharp blade is non-negotiable. Dull blades lead to sloppy cuts and frustration.
- Metal ruler or straightedge: For clean, straight cuts.
- Scissors: For detail work and curves.
- Hot glue gun: Get a dual-temperature model with extra glue sticks.
- Pencil and eraser: For marking cut lines and measurements.
- Hole punch or awl: For creating holes for dowels and string.
- Cutting mat (optional but recommended): Protects your work surface and extends blade life.
If you want to level up, consider adding:
- Rotary cutter: Speeds up straight cuts significantly.
- Craft knife set: For intricate detail work.
- Bone folder: Helps create crisp, professional-looking folds.
Top Cardboard Arcade Game Ideas to Build at Home
The beauty of cardboard construction is the sheer variety of games you can build. Start with proven classics, then branch into original designs.
Classic Arcade-Style Games: Skee-Ball, Pinball, and Claw Machines
Skee-ball is one of the most popular cardboard arcade builds. The core mechanics are simple: a ramp, a series of target holes with different point values, and a ball return system. Use layered cardboard to create the ramp angle (typically 10-15 degrees), and cut graduated holes in the backboard. Ping-pong balls work better than marbles for this build, they’re lighter and bounce more predictably.
Pinball machines are more complex but incredibly rewarding. You’ll need to master spring-loaded launchers (rubber bands are your friend), flipper mechanisms (use cardboard levers with a fulcrum point), and bumpers (angled cardboard triangles). The playfield should be tilted at about 6-7 degrees. Recent coverage on gaming sites like Rock Paper Shotgun has featured cardboard pinball tournaments, highlighting how competitive the format can get.
Claw machines require precision engineering. The claw itself can be made from cardboard strips connected with string, operated by a pull-cord mechanism. The challenge is creating smooth vertical and horizontal movement, consider using a cardboard grid suspended on fishing line.
Creative Original Designs: Racing Games, Shooters, and Puzzle Challenges
Racing games can use marbles rolling down parallel tracks with obstacles and jumps. Players simultaneously release marbles and the first to cross the finish line wins. Add variable track elements (ramps, curves, gates) to increase replayability.
Shooters work well with rubber band mechanics. Build a cardboard fort or target gallery, then use rubber band “guns” (clothespin launchers are simple and effective) to knock down cardboard enemies. Assign point values to different targets based on difficulty.
Puzzle challenges might include cardboard mazes operated by tilt controls, or ball-sorting machines where players must route colored balls through the correct paths using adjustable gates. These translate well to multiplayer speedrun competitions.
Multiplayer and Competitive Cardboard Game Setups
Multiplayer builds need careful balancing. Basketball pop-a-shot setups with multiple hoops and simultaneous timers create natural competition. Air hockey tables can be built with a smooth cardboard surface, raised edges, and makeshift paddles, though you’ll need to wax or tape the playing surface for proper puck glide.
Foosball tables are surprisingly achievable. Use long dowels for rods, attach cardboard player cutouts, and create goals at each end. The key is ensuring the rods rotate smoothly, drill slightly oversized holes and consider adding a small amount of petroleum jelly as lubricant.
The classic appeal of arcade games translates remarkably well to cardboard form when you nail the core mechanics.
Step-by-Step Guide to Building Your First Cardboard Arcade Game
Let’s walk through the construction process using a medium-complexity project: a cardboard skee-ball machine.
Planning Your Design: Blueprints and Prototyping
Before cutting anything, sketch your design with measurements. For skee-ball, you need:
- Base dimensions: 36″ long × 12″ wide works for a tabletop version
- Ramp length and angle: 24″ ramp at 12-degree incline
- Backboard with target holes: Three rows of holes (10, 20, 30, 40, 50 points)
- Ball return: A channel beneath the backboard that funnels balls back to the player
Create a small-scale prototype first (half size or smaller). This lets you test the ball physics and adjust angles before committing to final construction. Pay special attention to how balls bounce, cardboard has more friction than arcade wood, so you may need steeper angles or lighter balls.
Construction Techniques: Cutting, Folding, and Assembly Tips
Cutting: Always measure twice, cut once. Use a metal ruler and sharp blade, applying multiple light passes rather than one heavy cut. For circles (target holes), trace templates and cut carefully with a craft knife, rotating the cardboard rather than the blade.
Folding: Score fold lines first by running your blade lightly along the line (don’t cut through, just compress the cardboard). This creates clean, professional folds. A bone folder or the back of a butter knife can burnish creases for crisp edges.
Assembly: Build from the base up. Start with the main platform, then add the ramp structure (layered cardboard strips create the incline), followed by the backboard. Use hot glue for structural joints and white glue for detail work. Allow glue to fully cure before stress-testing.
Reinforce high-stress areas with additional cardboard layers or tape. The ramp edges and ball impact zones will take the most abuse.
Adding Game Mechanics: Marbles, Rubber Bands, and Simple Physics
The ball return is crucial for playability. Create a sloped trough behind the backboard that funnels all balls to a central exit point. Line it with packing tape for smoother rolling.
For rubber band mechanics (useful in other projects), create anchor points by poking holes and threading the rubber band through, then tying a knot on the back side. Double or triple up rubber bands for more power.
Test your game physics extensively. Adjust ramp angles, hole sizes, and surface textures until the gameplay feels right. Cardboard absorbs impact differently than wood or plastic, so what works in a commercial arcade may need tweaking.
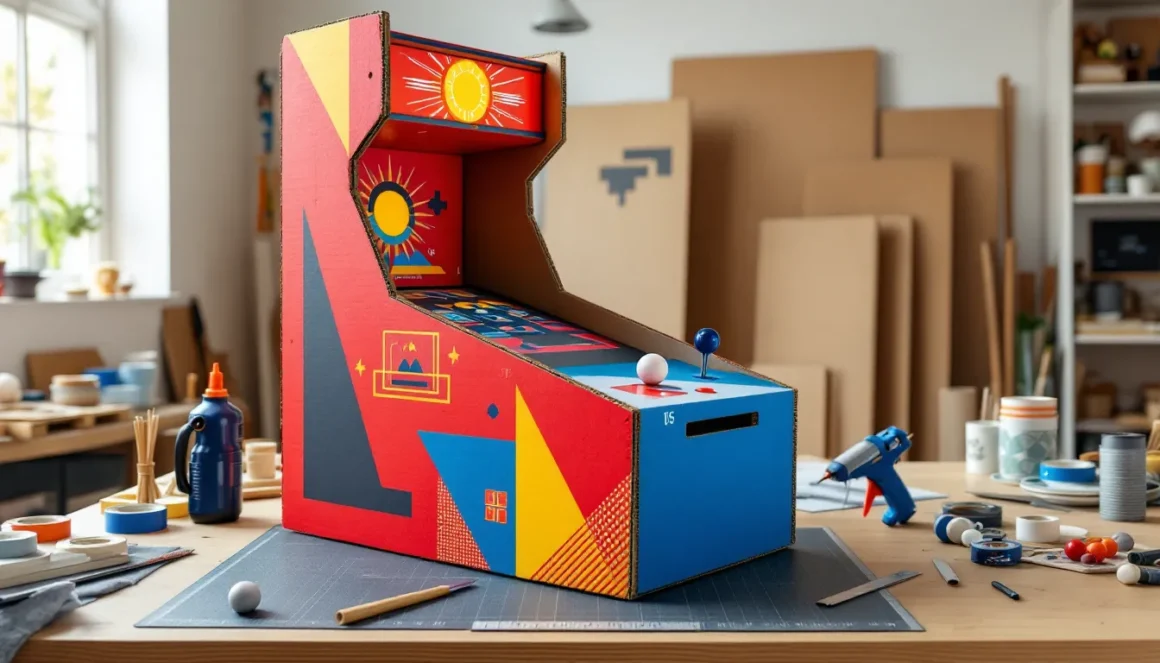
Decorating and Customizing Your Cardboard Arcade
A well-decorated cardboard arcade transforms a brown box into a legitimate gaming experience. Visuals matter, they signal to players that this is a real game worth their time.
Paint, Graphics, and Visual Design for Authentic Arcade Aesthetics
Acrylic paint adheres well to cardboard and dries quickly. Prime bare cardboard with white acrylic first (diluted 50/50 with water) to prevent warping and create a better color base. Two thin coats beat one thick coat.
For classic arcade aesthetics, study cabinet art from the 1980s-90s. Bold primary colors, geometric patterns, and high-contrast text were standard. Use stencils for clean lettering, or print designs on regular paper and glue them to the cardboard.
Recommended color schemes:
- Neon colors on black (very ’80s arcade)
- Red, yellow, and blue primary scheme (classic carnival)
- Pixel art and retro graphics (appeals to retro gaming fans)
Consider the viewing angle. Cabinet sides, front panels, and backboards are your prime visual real estate. Don’t neglect the sides, players and spectators see them constantly.
Posterboard or construction paper can be cut into decorative elements and glued on for added dimension. Shiny duct tape in bright colors creates excellent trim and borders.
Adding Lights, Sounds, and Electronic Elements
Basic electronics elevate cardboard arcades significantly. LED strip lights (battery-powered versions) can be taped inside the cabinet or around the marquee. They’re cheap (under $15 for basic strips) and create authentic arcade glow.
Simple sound effects can be added using:
- Small Bluetooth speakers hidden inside the cabinet, playing looped arcade ambiance from your phone
- Doorbell modules or greeting card sound chips (hack them to trigger on ball impact or game completion)
- Piezo buzzers connected to simple circuits for beeps and tones
For scoring displays, consider using dry-erase boards or simple flip cards. If you want to go further, Arduino-based scoring systems can be integrated for under $30, but that’s beyond the scope of most builds.
The gaming community has published numerous guides on integrating basic electronics. Coverage on sites like IGN occasionally features maker content that bridges digital and physical gaming experiences.
Hosting Your Own Cardboard Arcade Event or Tournament
Once you’ve built a few games, hosting an event is the natural next step. Cardboard arcade tournaments bring community together and showcase your builds.
Setting Up a Multi-Game Arcade Experience
For a proper arcade feel, you need variety. Aim for 4-6 different games minimum. Mix game types:
- Skill-based (skee-ball, basketball shooters)
- Timing-based (racing games, whack-a-mole variants)
- Luck-based (prize wheels, claw machines)
- Multiplayer competitive (foosball, air hockey)
Layout matters. Space games at least 4-5 feet apart to prevent crowding. Create clear traffic flow with a designated entrance, game area, and prize redemption zone. Use signs (cardboard, obviously) to mark each game and display rules.
For larger events, recruit volunteers to manage individual games, especially complex ones that need reset between turns. Younger volunteers work great, they’re enthusiastic and it teaches them responsibility.
Lighting and music complete the atmosphere. String lights or floor lamps create ambiance if you can’t use LEDs in every game. A portable speaker playing 8-bit game soundtracks or retro arcade music sets the mood.
Creating Scoring Systems, Tickets, and Prizes
Ticket systems are classic arcade motivation. Players earn cardboard or paper tickets based on scores, then redeem them for prizes. Standard conversion:
- Small prizes: 10-25 tickets
- Medium prizes: 50-100 tickets
- Large prizes: 200+ tickets
Prize options can be candy, small toys, gaming stickers, or homemade items. Dollar stores are your friend here. Budget about $1-2 per expected player for prizes.
For competitive tournaments, use bracket systems. Single-elimination works for speed, but double-elimination is fairer for serious competition. Track scores publicly on a large cardboard leaderboard, visible rankings drive engagement.
Consider creating custom trophies from cardboard. A well-designed cardboard trophy is more meaningful than a cheap plastic one, and it’s on-brand.
Many builders who started with home events have expanded to hosting at local libraries, community centers, or even gaming conventions. The evolution of arcade experiences shows that physical arcade events still draw crowds in 2026.
Tips for Durability and Maintenance of Cardboard Games
Cardboard has limitations, but proper construction and maintenance can extend game lifespan from weeks to years.
Reinforcement Techniques to Extend Game Lifespan
The weakest points in any cardboard structure are:
- Fold lines (they’ll eventually tear)
- Impact zones (where balls hit repeatedly)
- Weight-bearing joints
Reinforce these areas aggressively:
- Fold lines: Apply packing tape along both sides of folds, or glue a strip of fabric (old t-shirt material works) over the fold.
- Impact zones: Layer 3-4 sheets of cardboard in high-impact areas. The backboard behind skee-ball holes should be triple-thick minimum.
- Joints: Use both glue AND tape. Consider adding cardboard gussets (triangular braces) at right-angle joints for extra stability.
Edge banding protects exposed cardboard edges from fraying. Duct tape, packing tape, or even strips of fabric glued along edges significantly extend lifespan.
For games that see heavy use, consider hybrid construction: cardboard for most of the structure, but wood or plastic for critical stress points. A wooden dowel axle will outlast a cardboard one by orders of magnitude.
Storage and Repair Solutions for Long-Term Use
Storage: Keep cardboard games in dry, climate-controlled spaces. Humidity is cardboard’s worst enemy, it causes warping and weakens glue bonds. Basements and garages are risky unless climate-controlled. If you must store games in humid environments, wrap them in plastic sheeting.
Store games vertically when possible to prevent crushing. Disassemble modular components to save space.
Repairs: Keep a repair kit handy with hot glue, tape, extra cardboard, and scissors. Most damage can be fixed in under 10 minutes. For torn surfaces, patch with fresh cardboard and tape both sides. For broken mechanisms, often it’s faster to rebuild the component than to repair it.
Plan for obsolescence. High-traffic games will need rebuilding eventually. Document your builds with photos and measurements so you can recreate them quickly.
The hands-on approach to building arcade games teaches valuable lessons about material science and engineering that apply beyond cardboard.
Cardboard Arcade Games vs. Digital Gaming: A Unique Gaming Experience
Cardboard arcades occupy a unique space in the gaming landscape. They’re not a replacement for digital gaming, they’re a complement, offering something that screens can’t.
Tangibility and Physical Feedback: There’s no substitute for the weight of a ball in your hand, the resistance of a lever, or the satisfying thunk of a skee-ball landing in the 50-point hole. Digital haptics are improving, but they don’t replicate real-world physics.
Social Dynamics: Cardboard games force face-to-face interaction. Players see each other’s reactions, trash-talk in real time, and experience shared moments without screen mediation. For competitive gamers used to online lobbies, the shift to physical presence can be refreshing.
Creative Ownership: Building your own game creates a different relationship with it than playing someone else’s creation. You understand the mechanics intimately because you engineered them. This builds design literacy that translates to better understanding of digital game design.
Accessibility: Not everyone has access to high-end gaming PCs or current-gen consoles, but cardboard is genuinely accessible. Kids in under-resourced communities can build competitive-quality games with scavenged materials.
Limitations: Cardboard can’t replicate the visual fidelity, narrative complexity, or mechanical depth of modern digital games. It’s a different category entirely. Recent features on Game Rant covering gaming trends have noted that hands-on gaming experiences are increasingly seen as complementary hobbies rather than competitors to digital gaming.
The sweet spot is using both. Build a cardboard racing game, then analyze how it compares to your favorite racing sim. The contrast reveals design choices that are invisible when you only experience one medium.
Conclusion
Cardboard arcade games prove that compelling gaming experiences don’t require GPUs, netcode, or patches. They require creativity, basic materials, and a willingness to iterate. Whether you’re building a single skee-ball machine for your kid’s birthday or constructing a full arcade for a community event, the process teaches valuable lessons about game design, physics, and resourcefulness.
The barrier to entry is lower than any other form of game creation, you can start building today with materials already in your recycling bin. The skills you develop translate across disciplines: spatial reasoning, prototyping, user testing, and visual design.
In 2026’s gaming landscape dominated by photorealistic graphics and million-dollar budgets, there’s something rebellious and pure about a game made from trash that brings genuine joy. The cardboard arcade movement shows no signs of slowing. Start building, start playing, and see where it takes you.